25 Beginner-Friendly Small Woodworking Projects to Try at Home
Small woodworking projects offer the perfect entry point into the rewarding world of woodcraft. Whether you’re limited on space, tools, or experience, these compact creations provide the satisfaction of working with wood without overwhelming commitment. In this guide, we’ll explore 25 accessible projects that can be completed in a weekend or less, helping you build skills while creating beautiful, functional items for your home.
Table of Contents
5 Benefits of Starting with Small Woodworking Projects
Before diving into specific projects, let’s explore why small-scale woodworking is ideal for beginners. These compact creations offer numerous advantages that make them perfect starting points for your woodworking journey.
Skill Development Without Overwhelm – Small projects let you practice fundamental techniques like measuring, cutting, and joining without the pressure of complex builds. You’ll gain confidence with each completed project.
Minimal Tool Investment – You don’t need a fully-equipped workshop to get started. Many small projects require just a few basic tools, making this hobby accessible with limited initial investment.
Quick Completion Time – Unlike larger furniture pieces that might take weeks, small projects can often be completed in a single afternoon or weekend, providing immediate satisfaction and motivation.
Space-Friendly Creation – Limited space? No problem. Small projects can be built on a kitchen table or small workbench, making woodworking possible even in apartments or homes without dedicated workshops.
Low Material Cost – Small projects typically require minimal wood, often utilizing scraps or inexpensive stock. This reduces the financial risk while you’re developing skills and discovering your style preferences.

Essential Tools and Materials for Small Woodworking Projects
Basic Tools Checklist
You don’t need a professional workshop to begin creating beautiful wooden items. Here’s a starter toolkit that will serve you well for most beginner projects:
Measuring and Marking – Tape measure, combination square, pencil
Cutting Tools – Hand saw, coping saw, or jigsaw
Shaping and Smoothing – Sandpaper (various grits), sanding block
Assembly Tools – Hammer, screwdriver set, drill (optional but helpful)
Clamping – 2-4 bar clamps or C-clamps
Finishing Supplies – Paintbrushes, rags, wood finish or paint
“The best investment a beginner woodworker can make isn’t in expensive tools, but in learning to use basic tools well.”
– Nick Offerman, Actor & Woodworker
Recommended Wood Types for Beginners
Different woods offer varying levels of workability and cost. These options are ideal for beginners:
Pine – Inexpensive, soft, and easy to work with. Great for practicing and general projects.
Poplar – Slightly harder than pine but still beginner-friendly. Takes paint well.
Plywood – Stable and available in large sheets. Perfect for projects requiring larger flat surfaces.
Cedar – Naturally resistant to moisture and insects. Ideal for outdoor projects.
Oak – More challenging but beautiful grain. Try this after gaining some experience.

25 Small Woodworking Projects for Beginners
From simple afternoon builds to weekend challenges, these projects are perfect for developing your woodworking skills while creating useful and decorative items. Each project includes a difficulty rating and estimated completion time to help you choose where to begin.

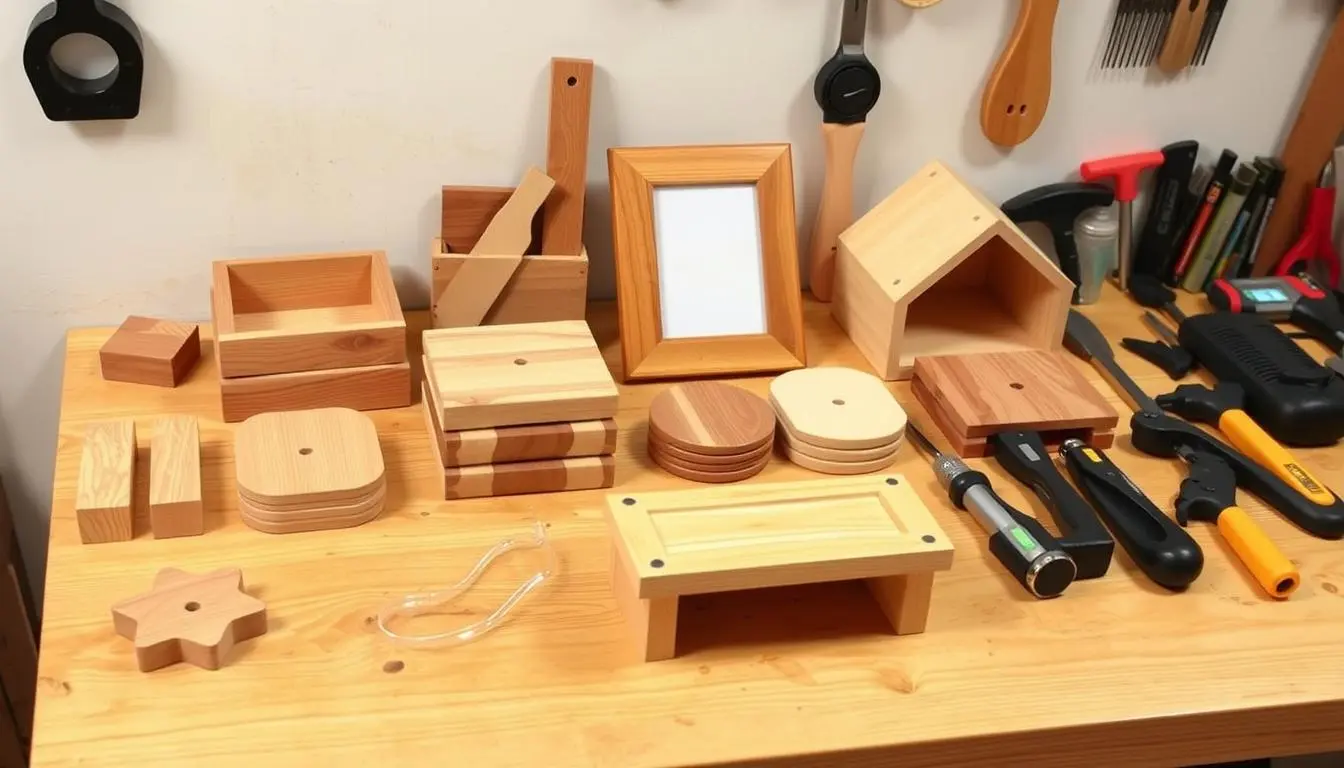
1. Wooden Coasters
⭐ Beginner
- 📏 Materials: 1×4 lumber or plywood
- ⏱️ Time: 1-2 hours
Perfect first project! Cut squares or circles, sand edges smooth, and apply a waterproof finish. Customize with stain, paint, or wood burning for personal flair.

2. Rustic Picture Frame
⭐ Beginner
- 📏 Materials: 1×2 lumber, wood glue
- ⏱️ Time: 2-3 hours
Create a personalized frame for your favorite photos. Practice making 45° miter cuts and basic assembly techniques with this functional project.

3. Floating Shelf
⭐⭐ Intermediate
- 📏 Materials: 1×8 lumber, wood glue
- ⏱️ Time: 3-4 hours
Add storage and style to any room with a simple floating shelf. This project introduces basic joinery and wall mounting techniques.

4. Phone Stand
⭐ Beginner
- 📏 Materials: Scrap wood pieces
- ⏱️ Time: 1 hour
A practical project that requires minimal materials. Perfect for video calls or watching content on your device hands-free.

5. Minimalist Bookends
⭐ Beginner
- 📏 Materials: 2×4 lumber, wood glue
- ⏱️ Time: 1.5 hours

6. Small Cutting Board
⭐⭐ Intermediate
- 📏 Materials: Hardwood board
- ⏱️ Time: 3 hours
Create a functional kitchen accessory while learning about food-safe finishes and edge treatments. Makes a great gift!

7. Simple Birdhouse
⭐⭐ Intermediate
- 📏 Materials: 1×6 lumber, exterior screws
- ⏱️ Time: 4 hours
Attract feathered friends with this classic project. Learn about outdoor joinery and weather-resistant construction techniques.

8. Desk Organizer
⭐⭐ Intermediate
- 📏 Materials: 1/4″ plywood, wood glue
- ⏱️ Time: 3-4 hours
Tame desktop clutter with this practical organizer. Practice making precise cuts and simple box joints.

9. Plant Stand
⭐⭐ Intermediate
- 📏 Materials: 1×2 lumber, wood screws
- ⏱️ Time: 2-3 hours
Elevate your houseplants with this stylish stand. Great for practicing angled cuts and creating stable structures.

10. Key Holder
⭐ Beginner
- 📏 Materials: Small wood board, hooks
- ⏱️ Time: 2 hours
Never lose your keys again with this practical wall-mounted holder. Customize with stains or paint to match your decor.

11. Serving Tray
⭐⭐ Intermediate
- 📏 Materials: 1×4 lumber, plywood
- ⏱️ Time: 4 hours
Create a functional tray for serving meals or organizing items. Practice creating frames and attaching handles.

12. Small Jewelry Box
⭐⭐⭐ Advanced
- 📏 Materials: Hardwood, small hinges
- ⏱️ Time: 6-8 hours
A more challenging project that introduces box joinery, fitting a lid, and possibly installing small hardware.

13. Geometric Wall Art
⭐⭐ Intermediate
- 📏 Materials: Thin wood pieces, plywood backing
- ⏱️ Time: 4-5 hours
Express your creativity with this decorative piece. Experiment with different wood species or stains for contrast.

14. Tablet Stand
⭐ Beginner
- 📏 Materials: 1×6 lumber
- ⏱️ Time: 2 hours
Similar to a phone stand but sized for tablets. Great for watching videos or following recipes in the kitchen.

15. Simple Storage Box
⭐⭐ Intermediate
- 📏 Materials: 1/2″ plywood or solid wood
- ⏱️ Time: 3-4 hours
Create a versatile box for storing small items. Practice basic box construction techniques.

16. Balancing Wine Holder
⭐⭐ Intermediate
- 📏 Materials: 1×6 hardwood piece
- ⏱️ Time: 2 hours
This clever design uses physics to balance a wine bottle horizontally. A great conversation piece!

17. Napkin Holder
⭐ Beginner
- 📏 Materials: 1/4″ plywood
- ⏱️ Time: 1-2 hours
A practical kitchen accessory that’s simple to build. Great for practicing basic cuts and assembly.

18. Wooden Candle Holders
⭐ Beginner
- 📏 Materials: 2×2 or 4×4 lumber
- ⏱️ Time: 2 hours
Create a set of decorative candle holders in varying heights. A great project for practicing drilling precise holes.

19. Cookbook Stand
⭐⭐ Intermediate
- 📏 Materials: 1×6 lumber, small hinges
- ⏱️ Time: 3-4 hours
Keep your recipes at eye level and protected from spills with this practical kitchen helper.

20. Wooden Doorstop
⭐ Beginner
- 📏 Materials: Scrap wood block
- ⏱️ Time: 1 hour
A simple yet useful project that can be completed quickly. Great for using up scrap wood pieces.

21. Small Footstool
⭐⭐⭐ Advanced
- 📏 Materials: 2×4 lumber, wood screws
- ⏱️ Time: 5-6 hours
A functional piece that introduces more complex joinery and structural considerations.

22. Business Card Holder
⭐ Beginner
- 📏 Materials: Small hardwood piece
- ⏱️ Time: 1-2 hours
A professional-looking desk accessory that’s surprisingly simple to make.

23. Mail Organizer
⭐⭐ Intermediate
- 📏 Materials: 1/4″ plywood, 1×2 lumber
- ⏱️ Time: 4 hours
Keep your entryway tidy with this wall-mounted organizer for mail and keys.

24. Spice Rack
⭐⭐ Intermediate
- 📏 Materials: 1×2 and 1×4 lumber
- ⏱️ Time: 3-4 hours
Organize your kitchen with this practical rack. Can be wall-mounted or designed to sit on a counter.

25. Pencil Holder
⭐ Beginner
- 📏 Materials: Small wood block
- ⏱️ Time: 1 hour
A quick project that’s perfect for organizing your desk. Drill holes in a wooden block for a minimalist design.
Step-by-Step Guides for 3 Popular Small Woodworking Projects
Ready to get started? Below are detailed instructions for three of our most popular beginner-friendly projects. Each guide includes a materials list, tool requirements, and step-by-step directions.
Project 1: Rustic Picture Frame

Materials Needed:
1×2 pine or cedar lumber (enough for perimeter of your photo plus overlap)Wood glueSandpaper (120 and 220 grit)Wood finish of choice (stain, paint, or clear coat)Picture frame backing (can use cardboard in a pinch)Glass or plexiglass cut to size (optional)Small nails or brad nailsPicture hanging hardware
Tools Required:
Measuring tapeMiter saw or miter box with hand sawHammer or brad nailerClampsSanding block
Step-by-Step Instructions:
Measure and Calculate – Determine the size of your photo. Add twice the width of your 1×2 lumber to both dimensions for the outer frame size.
Cut the Frame Pieces – Cut four pieces of your 1×2 lumber with 45° miters at each end. The long edge of each piece should match your calculated dimensions.
Sand the Pieces – Sand all surfaces with 120 grit sandpaper, then finish with 220 grit for smoothness.
Test Fit – Arrange the pieces to form your frame, ensuring the corners meet properly.
Glue and Clamp – Apply wood glue to the mitered ends and assemble the frame. Use corner clamps or a band clamp to hold everything tight while the glue dries (about 1-2 hours).
Reinforce Corners – For added strength, drive small nails or brads through the corners.
Apply Finish – Stain, paint, or clear-coat your frame as desired. Allow to dry completely.
Add Backing Support – Attach small pieces of wood or metal brackets to the back of the frame to hold your photo, backing, and glass in place.
Install Hanging Hardware – Attach picture hanging hardware to the back of the frame.
Insert Your Photo – Place glass (if using), photo, and backing into the frame and secure with the support pieces.
Project 2: Simple Birdhouse

Materials Needed:
1×6 cedar or pine lumber (approximately 4 feet)Exterior wood screws (1¼” length)Exterior wood glueSandpaper (120 grit)Exterior paint or sealer (optional)
Tools Required:
Measuring tape and pencilSaw (hand saw, jigsaw, or circular saw)Drill with bits (including 1½” hole saw or spade bit)Screwdriver or drill driverSanding block
Step-by-Step Instructions:
Cut the Wood Pieces:
- Front and back: Two 5½” x 8″ pieces (with one having a pitched top)
- Sides: Two 5½” x 8″ pieces (with pitched tops matching front/back)
- Floor: One 4″ x 4″ piece
- Roof: One 8″ x 8″ piece
Drill Entrance Hole – In the front piece, drill a 1½” diameter hole centered horizontally and positioned about 6″ from the bottom.
Sand All Pieces – Sand all surfaces and edges to prevent splinters and create a finished look.
Assemble the Box – Attach the sides to the front and back using wood glue and screws. Ensure the pitched tops align properly.
Attach the Floor – Center and attach the floor to the bottom of the box assembly, leaving a small gap on all sides for drainage.
Attach the Roof – Center the roof piece on top of the assembly and secure with screws. The roof should overhang the front and back slightly.
Add Drainage and Ventilation – Drill a few small (¼”) holes in the floor for drainage and near the top of the sides for ventilation.
Apply Finish (Optional) – If desired, apply exterior paint or sealer to protect the wood. Avoid painting the inside of the birdhouse.
Mount the Birdhouse – Attach to a tree, post, or building at a height of 5-10 feet, facing away from prevailing winds.
Project 3: Wooden Coasters

Materials Needed:
¼” or ½” thick hardwood or plywoodSandpaper (120, 180, and 220 grit)Wood finish (polyurethane, danish oil, or food-safe finish)Cork sheet (optional for bottom)Wood glue (if using cork)
Tools Required:
Measuring tape and pencilSaw (jigsaw, bandsaw, or scroll saw)Sanding block or power sanderCompass (if making circular coasters)
Step-by-Step Instructions:
Measure and Mark – Decide on your coaster size (typically 3½” to 4″ square or diameter) and mark the wood accordingly.
Cut the Shapes – Cut out your coasters using your saw of choice. For circular coasters, first draw the circles with a compass.
Sand the Edges – Start with 120 grit sandpaper to smooth the cut edges, then progress to finer grits (180, then 220) for a polished finish.
Sand the Faces – Sand both the top and bottom faces of each coaster to ensure a smooth finish.
Round the Edges (Optional) – Slightly round over the top edges of each coaster for a more finished look and comfortable feel.
Add Decorative Elements (Optional) – Consider adding wood burning designs, stains in patterns, or painted elements.
Apply Finish – Apply several thin coats of your chosen finish, following the product instructions. This step is crucial for water resistance.
Attach Cork Backing (Optional) – Cut cork to match the size of your coasters and glue to the bottom to prevent scratching surfaces.
Allow to Cure – Let the finish cure completely (usually 24-72 hours) before using your coasters.
5 Pro Tips for Small Woodworking Projects
“Measure twice, cut once. This old woodworking adage has saved me countless pieces of wood and hours of frustration.”
Master the Art of Measuring – Always double-check measurements before cutting. Use a sharp pencil for marking and a combination square for accuracy. Remember that saw blades have thickness (kerf), which affects your final dimensions.
Sanding Progression – Always sand in sequence from coarse to fine grits. Never skip more than one grit size. Sand with the grain to avoid visible scratches. A sanding block helps maintain flat surfaces.
Clamp Everything – Even when using screws or nails, clamp your pieces together first. This prevents wood from shifting during fastening and ensures tight joints. Remember: you can never have too many clamps.
Finishing Fundamentals – Apply finishes in thin, even coats rather than one thick coat. Sand lightly between coats with fine-grit paper (320+) for professional results. Always work in a dust-free environment when applying finishes.
Smart Material Selection – Choose the right wood for your project. Softwoods like pine are easier to work with but dent easily. Plywood offers stability for larger flat surfaces. For projects that will contact food or moisture, select appropriate species and finishes.
Getting Started with Small Woodworking Projects
Small woodworking projects offer the perfect entry point into the rewarding world of woodcraft. They require minimal investment, provide quick satisfaction, and help you build essential skills that transfer to larger projects.
Remember that every master woodworker started as a beginner. Don’t be discouraged by mistakes—they’re valuable learning opportunities. Start with simple projects like coasters or a picture frame, then gradually challenge yourself with more complex builds as your confidence grows.
The most important step is simply to begin. Choose one project from this guide that appeals to you, gather your materials, and start creating. With each completed project, you’ll gain skills, confidence, and the satisfaction of creating something beautiful and functional with your own hands.
“Start small – every master carpenter began with a single cut.”
